Print Preview
Preview the graphics or text data to be printed. Verify and adjust the print material and perform printing.
From the Main Menu select File > Print Preview.
Click ![]() Print Preview in the Icon Menu.
Print Preview in the Icon Menu.
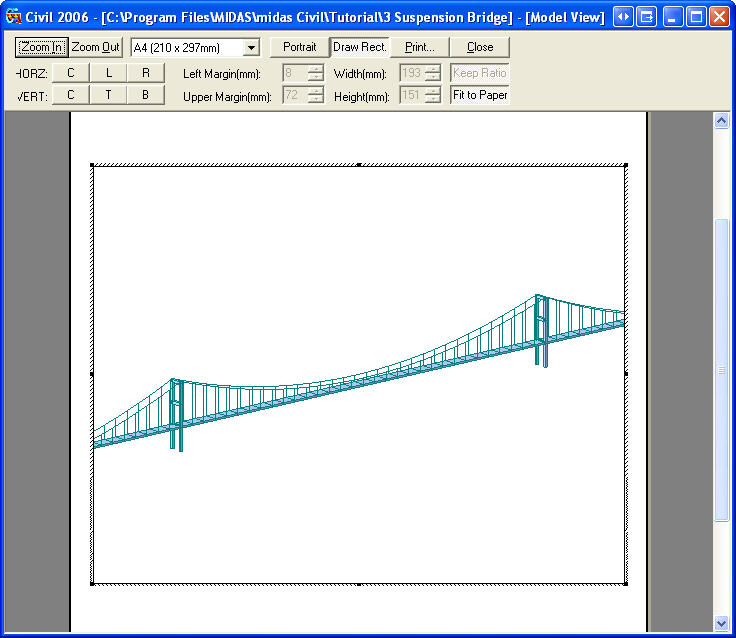
Print Preview displays the state of printing. The printable contents may be freely rearranged by the dialog box and mouse.

Print Preview
![]() /
/ ![]() : Magnify or reduce the print preview window
: Magnify or reduce the print preview window
![]() /
/ ![]() : Assign the direction of printing paper
: Assign the direction of printing paper
![]() : Select an option whether to include a rectangular border (Toggle on/off)
: Select an option whether to include a rectangular border (Toggle on/off)
HORZ
![]() : Horizontal-center alignment
: Horizontal-center alignment
![]() : Horizontal-left alignment
: Horizontal-left alignment
![]() : Horizontal-right alignment
: Horizontal-right alignment
VERT
![]() : Vertical-center alignment
: Vertical-center alignment
![]() : Vertical-top alignment
: Vertical-top alignment
![]() : Vertical-bottom alignment
: Vertical-bottom alignment
Left Margin (mm)
Upper Margin (mm)
Width (mm): Horizontal range of the printable area
Height (mm): Vertical range of the printable area
Keep Ratio: Maintain the initial vertical/horizontal screen length ratio (Toggle on/off)
Fit to Paper: Magnify or reduce the print object to fit into the size of paper (Toggle on/off)
Note
Once the user sets the margin, it will be saved under the Registry and the user-defined margin will be applied every time the user needs to print. Thus the user does not need to set it again.
Setting the layout and size of the print object with the mouse
Place the mouse cursor over the print object. Hold the mouse left-clicked and drag it to adjust the position.
Place the mouse cursor over one of the four corners or centers of the four sides, then the cursor will transform itself to an arrow ( ![]() or
or ![]() ). Hold the mouse left-clicked and drag the mouse toward the direction of the arrow to change the size in the selected direction.
). Hold the mouse left-clicked and drag the mouse toward the direction of the arrow to change the size in the selected direction.
When the print setting is finished, click ![]() to display the Print dialog box. Assign the printer, print range, number of copies, etc., then click
to display the Print dialog box. Assign the printer, print range, number of copies, etc., then click ![]() .
.