View Point
Assign a View Point to view the model from a desired position.
From the Main Menu select View > View Point > Iso.
From the Main Menu select View > View Point > Top(+Z).
From the Main Menu select View > View Point > Bottom(-Z).
From the Main Menu select View > View Point > Left(-X).
From the Main Menu select View > View Point > Right(+X).
From the Main Menu select View > View Point > Front(-Y).
From the Main Menu select View > View Point > Rear(+Y).
From the Main Menu select View > View Point > Angle.
From the Main Menu select View > View Point > Rotate Left.
From the Main Menu select View > View Point > Rotate Right.
From the Main Menu select View > View Point > Rotate Up.
From the Main Menu select View > View Point > Rotate Down.
Click ![]() Iso View in the Icon Menu.
Iso View in the Icon Menu.
Shortcut key: [Ctrl]+[Shift]+I
Click ![]() Top in the Icon Menu.
Top in the Icon Menu.
Shortcut key: [Ctrl]+[Shift]+T
Click ![]() Bottom in the Icon Menu.
Bottom in the Icon Menu.
Shortcut key: [Ctrl]+[Shift]+B
Click ![]() Left in the Icon Menu.
Left in the Icon Menu.
Shortcut key: [Ctrl]+[Shift]+L
Click ![]() Right in the Icon Menu.
Right in the Icon Menu.
Shortcut key: [Ctrl]+[Shift]+R
Click ![]() Front View in the Icon Menu.
Front View in the Icon Menu.
Shortcut key: [Ctrl]+[Shift]+F
Click ![]() Rear View in the Icon Menu.
Rear View in the Icon Menu.
Shortcut key: [Ctrl]+[Shift]+E
Click ![]() Angle in the Icon Menu.
Angle in the Icon Menu.
Click ![]() Rotate Left in the Icon Menu.
Rotate Left in the Icon Menu.
Shortcut key: [Ctrl]+[Alt]+![]()
Click ![]() Rotate Right in the Icon Menu.
Rotate Right in the Icon Menu.
Shortcut key: [Ctrl]+[Alt]+![]()
Click ![]() Rotate Up in the Icon Menu.
Rotate Up in the Icon Menu.
Shortcut key: [Ctrl]+[Alt]+![]()
Click ![]() Rotate Down in the Icon Menu.
Rotate Down in the Icon Menu.
Shortcut key: [Ctrl]+[Alt]+![]()
 Iso View
Click the relevant menu or icon to display the Isometric View of the model viewed from the coordinates (-0.483,-0.837,0.259) relative to GCS.
Top View
Click the relevant menu or icon to display the model viewed from + Z-direction.
Bottom View
Click the relevant menu or icon to display the model viewed from - Z-direction.
Left View
Click the relevant menu or icon to display the model viewed from - X-direction.
Right View
Click the relevant menu or icon to display the model viewed from + X-direction.
Front View
Click the relevant menu or icon to display the model viewed from - Y-direction.
Rear View
Click the relevant menu or icon to display the model viewed from + Y-direction.
Angle View
Click the relevant menu or icon to open the following dialog box.
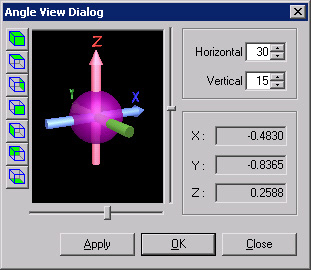
Angle View dialog box
Moving the right-hand Slide vertically rotates the axes about the horizontal axis. Moving the lower Slide horizontally rotates the axes about GCS Z-axis. Alternatively, values may be typed in the Horizontal and Vertical fields to modify View Point. Or, left-click the figure area in the dialog box and drag it to a desired position to modify View Point.
Rotate Left
Click the relevant menu or icon to rotate the model in the clockwise direction relative to the vertical direction of the screen. Use ![]() Display Option to adjust the unit rotation angle.
Display Option to adjust the unit rotation angle.
Rotate Right
Click the relevant menu or icon to rotate the model in counter-clockwise direction relative to the vertical direction of the screen.
Rotate Up
Click the relevant menu or icon to rotate the model upward relative to the horizontal direction of the screen.
Rotate Down
Click the relevant menu or icon to rotate the model downward relative to the horizontal direction on the screen.