Curve: Create Helix(Wire)
![]()
Function
Create a spiral wire, which consists of a series of connected edges in space.
Call
Geometry > Curve > Create
3D > Helix (Wire) 
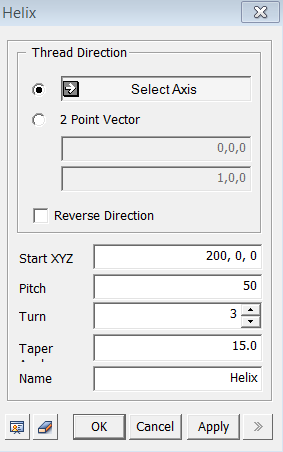
<Helix>
Thread Direction
The
selected direction vector becomes the centrical axis of a helix.
Select Axis
Select
a reference direction (Datum Axis, Datum
Plane, Face, Edge) for creating a helix.
2 Point Vector
Specify a reference direction from a vector which is defined
by two selected points.
Start XYZ
Enter
the 3D coordinates of a Start point [(ABS x, y, z)] of a helix. You may
pick a point on the screen for entering coordinates. Entering the coordinates
of a point can be much simplified by using the snap functions such as
Vertex Snap and Grid Snap.
Pitch
Enter
the increase in height corresponding to one complete revolution.
Turn
Enter
the number of revolutions of a helix.
Taper Angle
Enter
the angle of inclination of the side face of a helix relative to the reference
axis. The entered value and the actual inclination
may not coincide since slight deviations occur in the process of generating
the helix.
Name
Enter the name of the helix to be created.
When we enter coordinates using the mouse, the coordinates are automatically entered by a left-click on the desired point, without having to press the Apply button. However, when coordinates are typed in, either the Enter key or the Apply button needs to be pressed.
Reverse
Create a helix in the opposite direction of the selected reference axis.