Surface: Sew
![]()
Function
Sew creates a Shell from selected independent surfaces (Shell, Face). This command is applicable only when the surfaces (Shell, Face) do not overlap and are in contact with one another at the boundary edges.
Call
Geometry > Surface > Sew
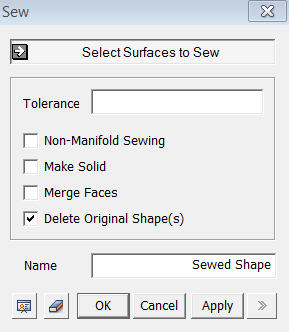
<Sew>
Select Surfaces to Sew
Select
shapes (Shell, Face) to be sawed.
Tolerance
Enter the Tolerance, which will be used for the Sew operation.
Name
Enter
the name of the shell to be created.
Pressing the Preview button shows the result of what will be created after the Sew operation. The parts appearing in dark red represents free edges, which will not be sewed because they are out of the tolerance range. In such a case, we can gradually increase the tolerance in small increments and repeat the Preview operation until the free edges no longer appear on the screen. If the Ok or Apply button is clicked with the free edges remaining, the shapes will be sewed including the free edges.
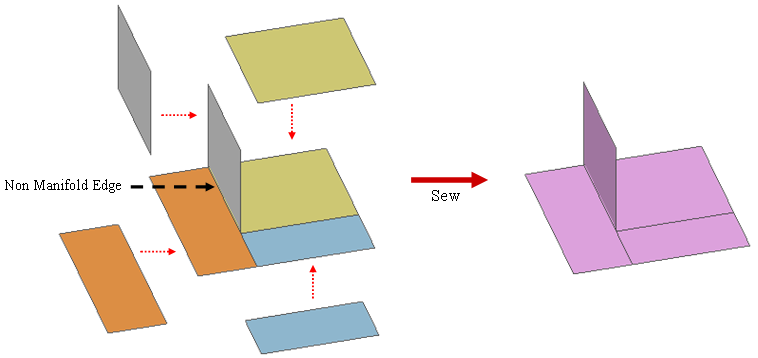
Non-manifold
This option sews three or more non-manifold faces,
which meet at a single edge. Unless this option
is selected, non-manifold faces will not be sewed.
Make Solid
If
the result Shape is completely closed, this options allows to fill in
the internal space to create a Solid.
Delete Original Shapes
This option deletes all the source shapes used in the sew operation and leaves only the shell created by the operation.
Notes
If the tolerance is too large, an improper shape may be created.
In case the Sew operation does not proceed even after adjusting the tolerance,
Check if the faces overlap.
Proceed with the Sew operation excluding the faces, which can not be sewed. Repeat the Sew operation after reconstructing the problematic faces using the edges surrounding the unsewed faces.
When local free Edges are present, we may carry on the Sew operation. In such a case, we can specify Seeding at the free edges during Mesh generation and carry out Node Merge after meshing.
Using the Trim 2 Surface menu, we can combine two shells or faces into a single shell.
After a Sew operation, some faces may not be shaded. This is caused by defective faces, which interacted with surrounding faces during the Sew operation and became improper faces. For such cases, the shapes can be modified using the Fix Shape command under Repair Factory. Or the problematic faces can be removed from the shell by Remove Sub-face, and then new faces are created using Boundary and sewed again.