Tunnel Modeling Wizard: Step 1 : General
![]()
Function
Tunnel Modeling Wizard (TMW) automates almost all the time-consuming operations of three dimensional modelling and produces output data reports for swift interpretation of analysis results. With respect to the enhancement to pre-processing, it provides various tunnel templates, NATM tunnelling method, advanced surface modelling tool for terrain and strata, and automatic hexahedral mesh generation. In addition, results of construction stage analysis are generated in an MS-Excel file, which is the most widely used data-entry software.
The general modelling procedure for TMW consists of 5 major steps: (a) configuration of a tunnel cross section and excavation type; (b) specification of shotcrete and rock bolts; (c) definition of excavation and construction stages; (d) configuration of mesh data with terrain and strata; and (e) preparation of reports with output data.
In the General tab, TMW provides a template for various tunnel cross sections and excavation types. Most common tunnel cross sections can be chosen from TMW, such as circular, 3-center circle and 5-center circle, including their inverts. A tunnel cross section does not necessarily have to be symmetrical; unsymmetrical sections can also be defined.
Call
Model > Tunnel Modeling Wizard
<Tunnel Wizard-General>
Type
Select
the type of 3D model (Full or Half).
Shape
Determine
the cross sectional shape of the tunnel. The labels for each defining
parameter are shown in the Input Guide figure.
Circular
Create
a circular section type
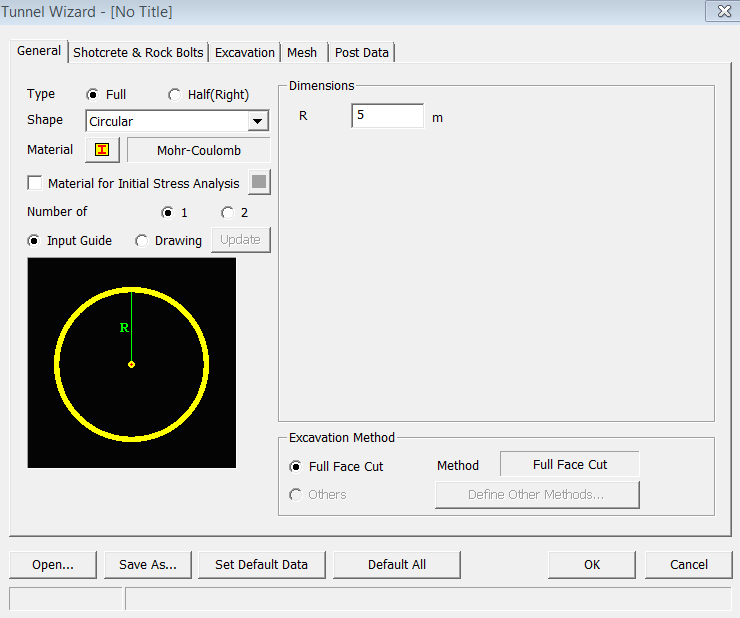
<Tunnel Wizard-General-Circular>
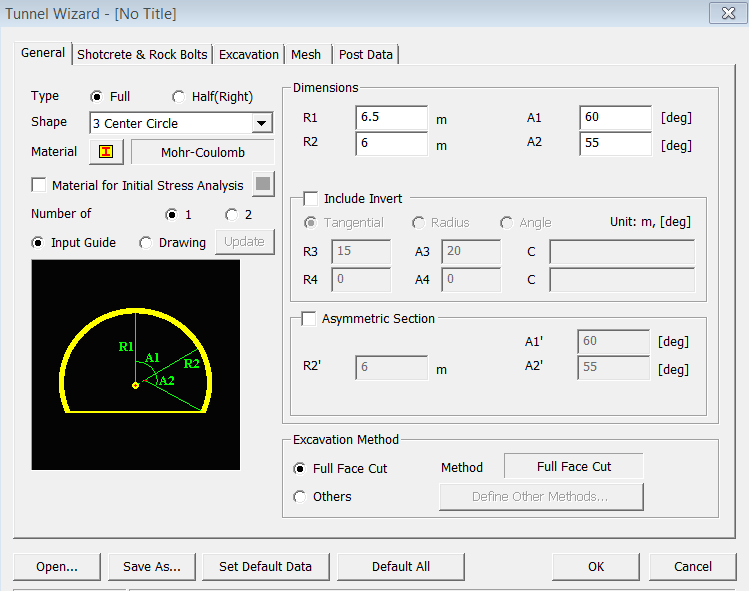
3 Center Circle
Define
a tunnel section with 3 center circle. The user also can specify the invert
option or unsymmetrical section.
<Tunnel Wizard-General-3 Center Circle>
5 Center Circle
Define
a tunnel section with 5 center circle. The user also can specify the invert
option or unsymmetrical section.
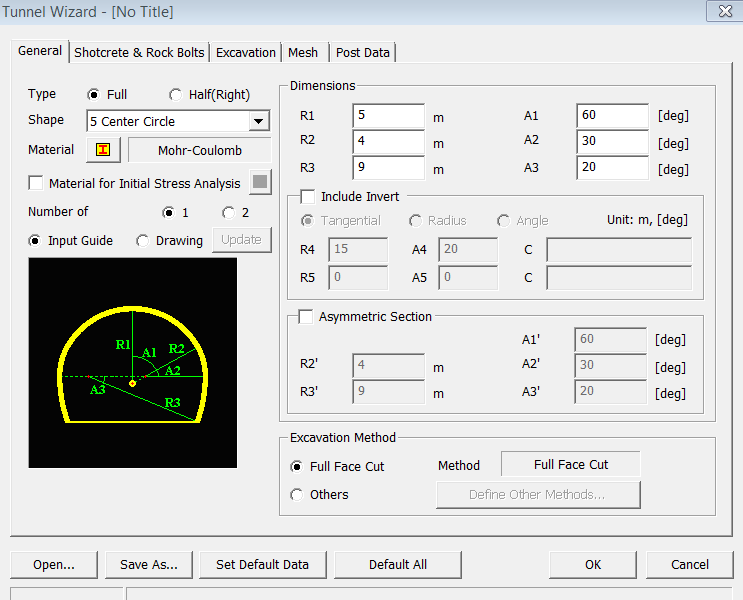
<Tunnel Wizard-General-5 Center Circle>
Material
Click
![]() button to define the material for general elements. When a model is generated
using the TMW, it contains a cubic area around the tunnel, and this material
is assigned to the element in the cubic area. Additional materials for
other ground layers can be defined in the later section.
button to define the material for general elements. When a model is generated
using the TMW, it contains a cubic area around the tunnel, and this material
is assigned to the element in the cubic area. Additional materials for
other ground layers can be defined in the later section.
Name
Enter
the name for the new material property.
Model Type
Select
a type of ground material. The following material models are offered:
Elastic, Mohr-Coulomb, Hoek-Brown, and Drucker-Prager.
<Elastic>
Specify the elastic material model.

<Tunnel Wizard-Elastic Material>
Elastic Modulus
Poisson's Ratio
Weight Density
Saturated Weight Density
Thermal Coefficient
Coefficient of Lateral Pressure (CLP)
Kox
Coefficient of lateral pressure in the Global X-direction.
Koy
Coefficient of lateral pressure in the Global Y-direction.
Koz
Coefficient
of lateral pressure in the Global X-direction.
<Mohr-Coulomb>
Specify the Mohr-Coulomb material model.
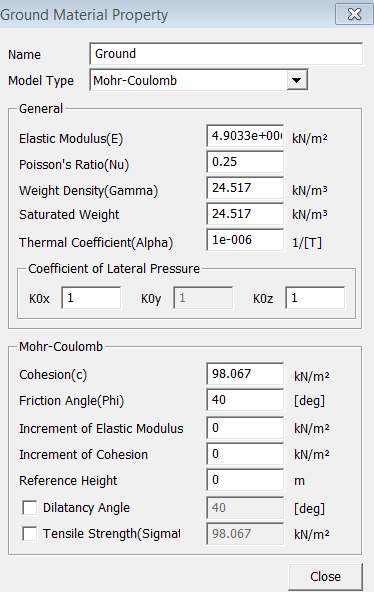
<Tunnel Wizard - Mohr-Coulomb Material>
Cohesion
Internal Frictional Angle
Tensile Strength
Inc. of Elastic Modulus
Enter
the increment of Elastic Modulus.
Inc. of Cohesion
Enter
the increment of Cohesion.
Reference Height
<Hoek-Brown>
Specify the Hoek-Brown material model.
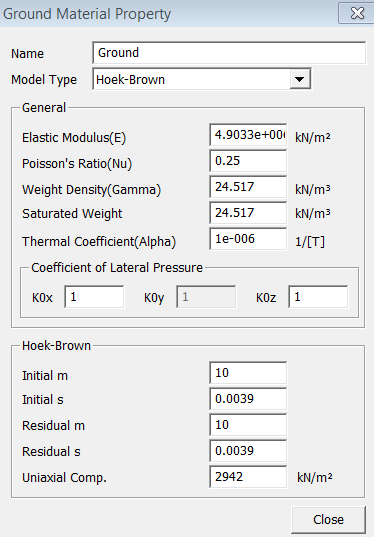
<Tunnel Wizard - Hoek-Brown Material>
Initial m
Enter
the initial m value.
Initial s
Enter
the initial s value.
Residual m
Enter
the residual m value.
Residual s
Enter
the residual s value.
Uniaxial Comp. Strength
Enter
the uniaxial compressive strength.
<Drucker-Prager>
Enter the Drucker-Prager material model.
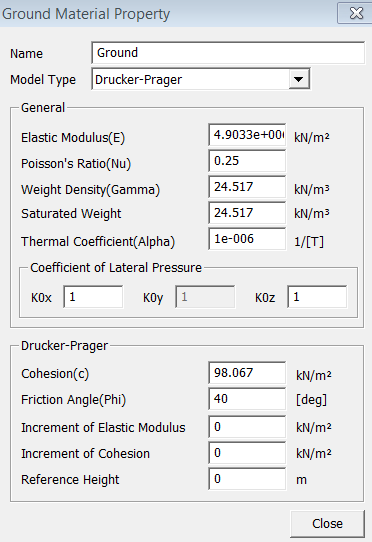
<Tunnel Wizard-Drucker-Prager Material>
Cohesion
Enter the Cohesion.
Internal Frictional Angle
Enter the Internal Frictional Angle.
Tensile Strength
Enter the tensile Strength.
Inc. of Elastic Modulus
Enter
the increment of Elastic Modulus.
Inc. of Cohesion
Enter
the increment of Cohesion.
Reference Height
Material for Initial Stress Analysis
Check
the option to use a different material for the initial stress analysis.
Click ![]() button to prompt the Ground Material Property dialog box.
button to prompt the Ground Material Property dialog box.
Number of Tunnels
Enter
the number of tunnels.
Input Guide
It
displays a figure which shows the necessary parameters to define a tunnel
section.
Drawing
It
displays a figure which shows the defined tunnel section in scale. Click
 button to update
the figure.
button to update
the figure.
Excavation Method
Determine
the excavation method.
Full Face Cut
Tunnel
gets excavated in one step.
Others
Select
an excavation method other than Full Face Cut. Click  button to prompt
the Define Excavation Method dialog box.
button to prompt
the Define Excavation Method dialog box.
Define Excavation Method
GTS
offers the following excavation method. Input Guide displays necessary
parameters on the screen. Click  button to update the tunnel profile.
Bench Cut 1
Define Excavation Cut dialog box to see a picture
of the Input Guide excavation is required to input variables.  Click the 'Update Draw' button and input the dimension value.
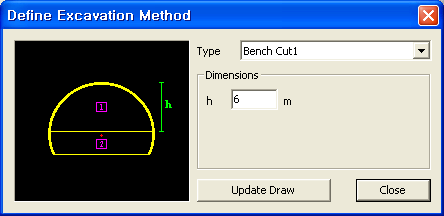
<Tunnel Wizard-Define Excavation Method-Bench Cut 1>
Bench Cut 2
efine Excavation Cut dialog box to see a picture
of the Input Guide excavation is required to input variables.
Click the 'Update Draw' button and input the dimension value.

<Tunnel Wizard-Define Excavation Method-Bench Cut 2>
Ring Cut 1
efine Excavation Cut dialog box to see a picture
of the Input Guide excavation is required to input variables.
버Click the 'Update Draw' button and input the dimension value.
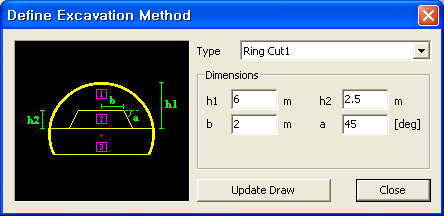
<Tunnel Wizard-Define Excavation Method-Ring Cut 1>
Ring Cut 2
efine Excavation Cut dialog box to see a picture
of the Input Guide excavation is required to input variables.
Click the 'Update Draw' button and input the dimension value.

<Tunnel Wizard-Define Excavation Method-Ring Cut 2>
CD Cut
efine Excavation Cut dialog box to see a picture
of the Input Guide excavation is required to input variables.
Click the 'Update Draw' button and input the dimension value.
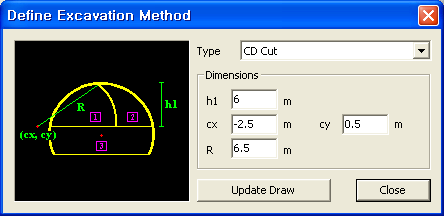
<Tunnel Wizard-Define Excavation Method-CD Cut>
.png)
Open
a Tunnel Wizard Save file (*.wzd).

Save
the current data to a Tunnel Wizard Save file (*.wzd).

Make
the current data as the default of TMW.

Reset all data to the default data.
Notes
Please refer to Basic Tutorial 2 for more details on the functions of TMW.