Pressure Load
Define the (in-plane) Pressure Load in an Analysis model.
The Pressure Load may be a uniformly distributed Pressure Load or a linearly varying Pressure Load from the start to the end. Pressure loads are internally converted into equivalent Nodal Loads.
Applicable Modules:
Ground |
Slope |
Soft Ground |
Foundation |
Seepage |
Dynamic |
From
the Main
Menu, select Loads
| Boundaries > Loads > Pressure Load ![]()
From the Command Line, type 'PressureLoad' or 'PL'
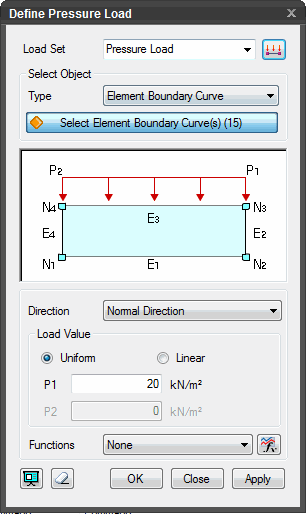 Load Set
Select the Load
Set under which the Pressure Load has to be assigned . Click ![]() to invoke the Define Load Set dialog
to Add, Modify or Delete Load Set(s).
to invoke the Define Load Set dialog
to Add, Modify or Delete Load Set(s).
Select Object
Select the objects to which Pressure Load will be assigned.
Element Boundary Curve
Select element edges to apply a Pressure Load along the edges.
Curve
Select curves to apply Pressure Load which will be converted to Nodal Loads on the nodes associated with the selected curves.
Direction
Select the direction of the Pressure Load- Normal Direction, Global X or Global Z.
Load
Specify the type of Pressure Load.
Uniform
Linear
P1, P2
Pressure load magnitude (P2 becomes activated if Linear type of Load Value is selected.)
Function
Click ![]() to define a function to specify a varying Pressure Load.
to define a function to specify a varying Pressure Load.
![]() Click Preview to check the created pressure load.
Click Preview to check the created pressure load.
![]() The dialog box will be initialized.
The dialog box will be initialized.
![]() After creating the load, the dialog box will close upon clicking.
After creating the load, the dialog box will close upon clicking.
![]() Click the ESC key to close the dialog box.
Click the ESC key to close the dialog box.
![]() After creating the load, the work process will switch to the state
of Select Element Boundary upon clicking.
After creating the load, the work process will switch to the state
of Select Element Boundary upon clicking.
Note: When Normal direction is selected, the + direction represents the direction from the outside of the element toward the inside of the element. In case of Global X or Global Z, the sign convention corresponds to the reference axes, +(→,↑) and - (←,↓).