Map Mesh
Generate quadrilateral element mesh after dividing enclosed domains (Curve or Surface) at even spacing.
Auto-mesh generates mesh of sufficiently adequate quality but Map Mesh is used to attain quadrilateral elements close to squares, which lead to more accurate results.
Applicable Modules:
Ground
|
Slope |
Soft Ground |
Foundation |
Seepage |
Dynamic |
From
the Main
Menu, select Model
> Mesh > Map Mesh ![]()
From the Command Line, type 'MapMesh' or 'MM'
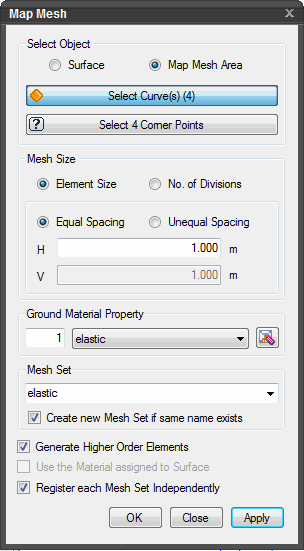
Select Object
Select the objects to be meshed.
Surface
Select surface(s) to be meshed.
Map Mesh Area
Select domains enclosed by lines to be map meshed.
Select Surface(s)
Select the surfaces to be map meshed (In case object selection is Surface).
Select Curve(s)
Select the curves to be map meshed (In case of domains enclosed by Curves).
Select 4 Corner Points
Select the corners of a Surface in case of Surface selection.
Mesh Size
Element Size
Enter the desired element size.
No. of Divisions
Enter the number of divisions to create elements.
Equal Spacing
Check this option to create elements with equal Horizontal (H) and Vertical (V) spacing.
Unequal Spacing
Check this option to create elements with unequal Horizontal (H) and Vertical (V) spacing.
Ground Material Property
Select a Ground
Material Property to be assigned to the mesh. Click ![]() to the right to Add new, Modify or Delete Ground Material Property.
to the right to Add new, Modify or Delete Ground Material Property.
Mesh Set
Enter the name of the Mesh Set.
Create new Mesh Set if same name exists
Check on ![]() to create a new Mesh Set if a Mesh Set
with the same name exists.
to create a new Mesh Set if a Mesh Set
with the same name exists.
Generate Higher Order Elements
Check on to generate higher order elements with intermittent nodes.
Use the Material assigned to Surface
Generates mesh elements with same Ground Material Property as that of the source Surface.
Register each Mesh Set Independently
When multiple surfaces (Area) and curves (Edge) are selected to be meshed, each mesh is independently registered in the Works Tree.
![]() Click to generate mesh. The dialog box will close automatically.
Click to generate mesh. The dialog box will close automatically.
Press the ESC
key or click ![]() to close
the dialog box.
to close
the dialog box.
![]() After mesh is generated, work process will switch to the state
of Select Surface(s)/Curve(s) upon clicking.
After mesh is generated, work process will switch to the state
of Select Surface(s)/Curve(s) upon clicking.
Note:
When generating mapped mesh, the element size information need not be specified to be able to use the mapped mesh as below. In case the element size is entered (or spacing is entered), mapped mesh can be generated as if the element size information were entered in the four sides composing the surface.

In the case of the left diagram, mapped mesh can be generated in the surface generally through a size and spacing. In a complex surface such as the right diagram, mapped mesh can be properly generated by specifying the four outer corner points of the surface. Corners normally need not be specified in a surface.

When mapped mesh is generated in an enclosed domain defined by lines such as the case below (a domain defined by 6 edges), the number of nodes to be generated on the edges 1, 2 and 3 and the number of nodes on the edge 5 need to coincide. The numbers of nodes on the edges 4 and 6 also need to coincide. That is, the facing sides need to have the same number of nodes to generate uniform mesh; otherwise, an error message will be generated.
